
Kotlin Flow with MVI

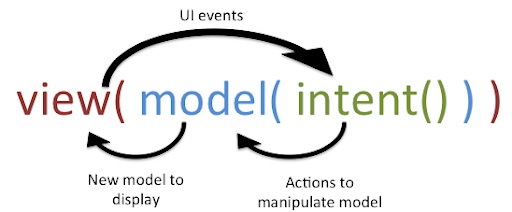
Before we start we want to have a small intro about the presentation architecture we are using these days to handle and work with our fragments and activities in the past 3 years we start working with the popular MVP and it was very useful to work with android and separating the logic from the UI the thing is it’s not reactive and we want to have something more reactive to work with plus in android, we really have a massive issue when we rotate our phones by losing the current screen state so thankfully Google decided to have a very useful pattern called MVVM where we have a view model and the view model will have an observer and we listen to the changes happening on this observer the thing is I see in many projects that we have a single view model with more than 5 to 6 observers in it why is that because it’s easy to create observers and post data to them and change the UI with it but when it comes to testing the UI some times things happened form any of the observers we are observing and we can’t trace where thes changes comes from so we have to trace our observers one by one and see the code implemented and check where exactly the issue is and what exactly happend in every observer we have that’s alot and when we are going to write testing for our porject we find it hard to test also for me at least 😔 becuse i need to opserver on the error or the loading or the result this a big thing to do now when I start looking around I find a very handy pattern called MVI so what is MVI its Model-View-Intent so the model is our bussiness logic and the view as we know the ui part and the intent where the user send as interaction with the application if you think about it you will se it easy to understand the user pass an intent -> then the intent will me manged by the model and pssing a view state to the view to set the view state and so on the cycle will keep repate unitl the user finish and soo on I don’t want to talk alot about the architectures patterns and more writnig let’s jumo into the code
I saw an example about implementing MVI with android and I find very handy examples to implement it one of the easy and nice examples is

https://github.com/ww-tech/roxie
and also others on GitHub thanks god we have very good developers to write code who also like to share their knowledge with us.
so if you look into the Roxie you will find that they change the naming to make it more understandable and easy to deal with rather than intent they call it Action and the process they call it to change so you will have action and change then the change will be reduced to ViewState you can have a look to the GitHub of the library it’s very nice to work with but it’s in RxJava that's a very good library but it’s really hard to learn so we decide to move with Flow it’s simple and easy to learn and we can write code with the same high quality we have in RxJave and without having any issues handling the concurrency or learning all the operators in the RxJava.
Let’s begin
- First to we need to have an example here the example is we need to login or register the user to the system so what we need is that we have a repository that will take care of that so ether will pass success or throw an exception.
- Our Repository will look like thisinterface AuthRepository {
@Throws(IllegalArgumentException::class)
suspend fun login(email: String, password: String): Flow<Boolean>
@Throws(IllegalArgumentException::class)
suspend fun register(email: String, password: String, displayName: String): Flow<Boolean>
}
2. then we need a ViewModel to deal with the actions and access the repo or the use case then return the ViewState before that let's have a look at what actions we need here.sealed class Actions {
data class LoginRequest(val email: String, val password: String) : Actions()
data class RegisterRequest(val email: String, val password: String, val displayName: String) : Actions()
object Init : Actions()
}
we will have an action for login and action for signup and if we need to have to init action for the first init state when we load the screen for the first time like load some data or do something before user start.
after that, we need to have a look for the next class where the action will be mapped to Change let’s have a look at the changes we have in the project.sealed class Change {
object LoadingChange : Change()
data class LoggedChange(val isLogged: Boolean) : Change()
data class RegisteredChange(val isRegistered: Boolean) : Change()
data class ErrorChange(val throwable: Throwable?) : Change()
}
thous are the most changes we will need to handle our actions and map our view state.
Now the ViewState we listen for the changes of this view state by rendering it in the UI, let’s have a look at our view statedata class State(
val isIdle: Boolean = true,
val isLoading: Boolean = false,
val isLogged: Boolean = false,
val isRegistered: Boolean = false,
val throwable: Throwable? = null
)
after we build our classes lets have a look how the actions will be handled and converted to view state
a user dispatched and action to our view model by this functionfun dispatch(action: Actions) {
viewModelScope.launch { actions.emit(action) }
}
by calling from the UI with this flow alsoeditEmail.textChanges()
.combine(editPassword.textChanges(), ::LoginRequest)
.flatMapConcat { pair -> buttonLogin.clicks().map { pair } }
.onEach { viewModel.dispatch(it) }
.collect { }
Now if you have a look you will see that the code still looks clean and functional and looks exactly as you are writing RxJava code but with ease of Flow.
Now the ViewModel after receiving the action will listen to the actions state flowprivate val actions = MutableStateFlow<Actions>(Actions.Init)
Then we will be merging our all actions together and wait until we emit an action here you will see that actions are filtered by instance and if it matches it will transform to another flow then it will map it to LoggedChange with the resultprivate val loginChanges = actions
.filterIsInstance<LoginRequest>()
.transform {
emit(Change.LoadingChange)
emitAll(authRepository.login(it.email, it.password)
.map { result -> Change.LoggedChange(result) })
}
.catch { emit(Change.ErrorChange(it)) }
.flowOn(io)
same for the signup but with a different change
then after we are having the actions build and connected to the repository we can now merge our actions and reduce them to ViewState
you will have a scan operator that will take initiate state and will have a reducer function holding the current change and old view-state, then we will copy the view state and change it to the new view-state
- State examplefun state(): LiveData<State> = merge(loginChanges, registerChanges)
.scan(initState, reducer)
.asLiveData(main) - Reducer exampleprivate val reducer: suspend (State, Change) -> State = { state, change ->
when (change) {
is Change.LoadingChange -> state.copy(isIdle = false, isLoading = true)
is Change.ErrorChange -> state.copy(
throwable = change.throwable,
isLoading = false
)
is Change.LoggedChange -> state.copy(
isLoading = false,
isLogged = change.isLogged
)
is Change.RegisteredChange -> state.copy(
isLoading = false,
isRegistered = change.isRegistered
)
}
}
and that's it you have now MVI Pattern with the flow now you just need to observe on the state from the UI the good thing is that you have only one way in one way out actions then state.
Example of the renderviewModel.state().observe(this@MainActivity, ::render)
the render function will have a view stateprivate fun render(state: State) {
progressBar.let {
if (state.isLoading) {
it.show()
} else {
it.hide()
}
}
editEmail.isEnabled = !state.isLoading
editPassword.isEnabled = !state.isLoading
state.isLogged.takeIf { it }?.let {
Toast.makeText(this, "User Is Logged", Toast.LENGTH_SHORT).show()
}
}
and here we are, enjoy working with MVI now the testing part will be also covered in the next article.
GitHub

Member discussion